
Linux security implementation
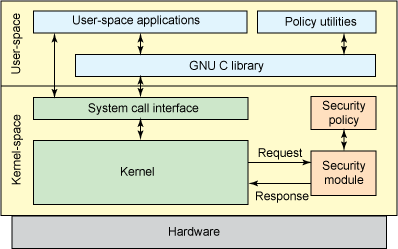
In the early days of SELinux, while it was still a set of patches, it provided its own security framework. This was problematic because it locked GNU/Linux into a single access-control architecture. Instead of adopting a single approach, the Linux kernel inherited a generic framework that separated policy from enforcement. This solution was the Linux Security Module (LSM) framework. The LSM provides a general-purpose framework for security that allows security models to be implemented as loadable kernel modules (see Figure 1). Figure 1. Security policy and enforcement are independent using SELinux.
Listing 1. Kernel code for socket creation
 static int __sock_create(int family, int type, int protocol,
              struct socket **res, int kern)
 {
     int err;
     struct socket *sock;
     /*
      *   Check protocol is in range
      */
     if (family < 0 || family >= NPROTO)
         return -EAFNOSUPPORT;
     if (type < 0 || type >= SOCK_MAX)
         return -EINVAL;
     err = security_socket_create(family, type, protocol, kern);
     if (err)
         return err;
     ...
The function security_socket_create is defined in ./linux/include/linux/security.h. It provides indirection from the call security_socket_create to the function that's dynamically installed in the security_ops structure (see Listing 2). Listing 2. Indirect call for the socket-creation check
 static inline int security_socket_create (int family, int type,
                      int protocol, int kern)
 {
     return security_ops->socket_create(family, type, protocol, kern);
 }
The function in the security_ops structure is installed by the security module. In this case, the hooks are defined in the loadable kernel module for SELinux. Each SELinux call is defined within the hooks file that completes the indirection from the kernel function to the dynamic call for the particular security module (see Listing 3 from .../linux/security/selinux/hooks.c).
Listing 3. The SELinux socket-creation check
 static int selinux_socket_create(int family, int type,
                  int protocol, int kern)
 {
     int err = 0;
     struct task_security_struct *tsec;
     if (kern)
         goto out;
     tsec = current->security;
     err = avc_has_perm(tsec->sid, tsec->sid,
               socket_type_to_security_class(family, type,
               protocol), SOCKET__CREATE, NULL);
 out:
     return err;
 }
At the core of Listing 3 is the call to validate that the current operation is permitted for current task (as defined by current->security, where current represents the currently executing task). The Access Vector Cache (AVC) is a cache of previous SELinux decisions (to increase the process's performance). This call includes the source security identifier (sid), the security class (constructed from the details of the requested operation), the particular socket call, and optional auxiliary audit data. If the decision isn't found in the cache, then the security server is invoked to obtain the decision (this process is shown in Figure 2). Figure 2. Layered Linux security process

The callback hooks initialized into security_ops are defined dynamically as a loadable kernel module (through register_security()) but otherwise contain dummy stub functions in the event that no security module is loaded (see ./linux/security/dummy.c). These stub functions implement the standard Linux DAC policy. The callback hooks exist at all points where object mediation must be provided for security. These include task management (creation, signaling, waiting), program loading (execve), file system management (superblock, inode, and filehooks), IPC (message queues, shared memory, and semaphore operations), module hooks (insertion and removal), and network hooks (covering sockets, netlink, network devices, and other protocol interfaces). You can learn more about the various hooks in the Resources section or by reviewing the security.h file. Managing the policies for SELinux is well beyond the scope of this article, but you can find more information about SELinux configuration in the Resources section.
security_
 /usr/include/X11/extensions/security.h
 /usr/include/libxslt/security.h
 /usr/src/kernels/2.6.32-642.1.1.el6.x86_64/include/linux/security.h
 /usr/src/kernels/2.6.32-642.1.1.el6.x86_64/include/config/ip/nf/security.h
 /usr/src/kernels/2.6.32-642.1.1.el6.x86_64/include/config/security.h
 /usr/src/kernels/2.6.32-642.1.1.el6.x86_64/include/config/jffs2/fs/security.h
 /usr/src/kernels/2.6.32-642.1.1.el6.x86_64/include/config/ip6/nf/security.h
 /usr/src/kernels/2.6.32-642.1.1.el6.x86_64/include/config/ext4/fs/security.h
 /usr/src/kernels/2.6.32-642.1.1.el6.x86_64/include/config/ext2/fs/security.h
 /usr/src/kernels/2.6.32-642.1.1.el6.x86_64/include/config/ext3/fs/security.h
 /usr/src/kernels/2.6.32-642.4.2.el6.x86_64/include/linux/security.h
 /usr/src/kernels/2.6.32-642.4.2.el6.x86_64/include/config/ip/nf/security.h
 /usr/src/kernels/2.6.32-642.4.2.el6.x86_64/include/config/security.h
 /usr/src/kernels/2.6.32-642.4.2.el6.x86_64/include/config/jffs2/fs/security.h
 /usr/src/kernels/2.6.32-642.4.2.el6.x86_64/include/config/ip6/nf/security.h
 /usr/src/kernels/2.6.32-642.4.2.el6.x86_64/include/config/ext4/fs/security.h
 /usr/src/kernels/2.6.32-642.4.2.el6.x86_64/include/config/ext2/fs/security.h
 /usr/src/kernels/2.6.32-642.4.2.el6.x86_64/include/config/ext3/fs/security.h
 /usr/src/kernels/2.6.32-642.3.1.el6.x86_64/include/linux/security.h
 /usr/src/kernels/2.6.32-642.3.1.el6.x86_64/include/config/ip/nf/security.h
 /usr/src/kernels/2.6.32-642.3.1.el6.x86_64/include/config/security.h
 /usr/src/kernels/2.6.32-642.3.1.el6.x86_64/include/config/jffs2/fs/security.h
 /usr/src/kernels/2.6.32-642.3.1.el6.x86_64/include/config/ip6/nf/security.h
 /usr/src/kernels/2.6.32-642.3.1.el6.x86_64/include/config/ext4/fs/security.h
 /usr/src/kernels/2.6.32-642.3.1.el6.x86_64/include/config/ext2/fs/security.h
 /usr/src/kernels/2.6.32-642.3.1.el6.x86_64/include/config/ext3/fs/security.h
 /usr/src/kernels/2.6.32-642.el6.x86_64/include/linux/security.h
 /usr/src/kernels/2.6.32-642.el6.x86_64/include/config/ip/nf/security.h
 /usr/src/kernels/2.6.32-642.el6.x86_64/include/config/security.h
 /usr/src/kernels/2.6.32-642.el6.x86_64/include/config/jffs2/fs/security.h
 /usr/src/kernels/2.6.32-642.el6.x86_64/include/config/ip6/nf/security.h
 /usr/src/kernels/2.6.32-642.el6.x86_64/include/config/ext4/fs/security.h
 /usr/src/kernels/2.6.32-642.el6.x86_64/include/config/ext2/fs/security.h
 /usr/src/kernels/2.6.32-642.el6.x86_64/include/config/ext3/fs/security.h
 /usr/src/kernels/2.6.32-573.22.1.el6.x86_64/include/linux/security.h
 /usr/src/kernels/2.6.32-573.22.1.el6.x86_64/include/config/ip/nf/security.h
 /usr/src/kernels/2.6.32-573.22.1.el6.x86_64/include/config/security.h
 /usr/src/kernels/2.6.32-573.22.1.el6.x86_64/include/config/jffs2/fs/security.h
 /usr/src/kernels/2.6.32-573.22.1.el6.x86_64/include/config/ip6/nf/security.h
 /usr/src/kernels/2.6.32-573.22.1.el6.x86_64/include/config/ext4/fs/security.h
 /usr/src/kernels/2.6.32-573.22.1.el6.x86_64/include/config/ext2/fs/security.h
 /usr/src/kernels/2.6.32-573.22.1.el6.x86_64/include/config/ext3/fs/security.h
Temporarily switch off enforcement You can switch the system into permissive mode with the following command:
echo 0 >/selinux/enforce
You'll need to be logged in as root, and in the sysadm_r role:
newrole -r sysadm_r
To switch back into enforcing mode:
echo 1 >/selinux/enforce
In Fedora Core and RedHat Enterprise Linux you can use the
setenforce
cat /selinux/enforce
which will print a "0" or "1" for permissive or enforcing - probably printed at the beginning of the line of the command prompt. Permanently Permissive The above will switch off enforcement temporarily - until you reboot the system. If you want the system to always start in permissive mode, then here is how you do it. In Fedora Core and RedHat Enterprise, edit /etc/selinux/config and you will see some lines like this:
 # This file controls the state of SELinux on the system.
 # SELINUX= can take one of these three values:
 # enforcing - SELinux security policy is enforced.
 # permissive - SELinux prints warnings instead of enforcing.
 # disabled - No SELinux policy is loaded.
 SELINUX=enforcing
 # SELINUXTYPE= can take one of these two values:
 # targeted - Only targeted network daemons are protected.
 # strict - Full SELinux protection.
 SELINUXTYPE=targeted
... just change SELINUX=enforcing to SELINUX=permissive, and you're done. Reboot if you want to prove it. For the other Linuxes which don't have the /etc/selinux/config file, you just need to edit the kernel boot line, usually in /boot/grub/grub.conf if you're using the GRUB boot loader. On the kernel line, add enforcing=0 at the end. For example,
 title SE-Linux Test System
      root (hd0,0)
      kernel /boot/vmlinuz-2.4.20-selinux-2003040709 ro root=/dev/hda1 nousb enforcing=0
      #initrd /boot/initrd-2.4.20-selinux-2003040709.img
Fully Disabling SELinux Fully disabling SELinux goes one step further than just switching into permissive mode. Disabling will completely disable all SELinux functions including file and process labelling. In Fedora Core and RedHat Enterprise, edit /etc/selinux/config and change the SELINUX line to SELINUX=disabled:
 # This file controls the state of SELinux on the system.
 # SELINUX= can take one of these three values:
 # enforcing - SELinux security policy is enforced.
 # permissive - SELinux prints warnings instead of enforcing.
 # disabled - No SELinux policy is loaded.
 SELINUX=disabled
 # SELINUXTYPE= can take one of these two values:
 # targeted - Only targeted network daemons are protected.
 # strict - Full SELinux protection.
 SELINUXTYPE=targeted
... and then reboot the system. For the other Linuxes which don't have the /etc/selinux/config file, you just need to edit the kernel boot line, usually in /boot/grub/grub.conf, if you're using the GRUB boot loader. On the kernel line, add selinux=0 at the end. For example,
 title SE-Linux Test System
     root (hd0,0)
     kernel /boot/vmlinuz-2.4.20-selinux-2003040709 ro root=/dev/hda1 nousb selinux=0
     #initrd /boot/initrd-2.4.20-selinux-2003040709.img
You will have to reboot to disable SELinux, you just can't do it while the system is running. Re-Enabling SELinux If you've disabled SELinux as in the section above, and you want to enable it again then you've got a bit of work to do. The problem will be that files created or changed when SELinux was disabled won't have the correct file labels on them - if you just reboot in enforcing mode then a lot of stuff won't work properly. What you need to do is to enable SELinux by editing /etc/selinux/config (for Fedora/RedHat) or by adding selinux=1 to the kernel boot line, then boot into permissive mode, then relabel everything, and then reboot into (or simply switch to) enforcing mode. After booting into permissive mode, run
fixfiles relabel
Alternatively, in Fedora and RedHat Enterprise Linux you can run
touch /.autorelabel
and reboot or put
autorelabel
on the boot command line - in both cases the file system gets a full relabel early in the boot process. Note that this can take quite some time for systems with a large number of files. After relabelling the filesystem, you can switch to enforcing mode (see above) and your system should be fully enforcing again.
Коментари
Публикуване на коментар