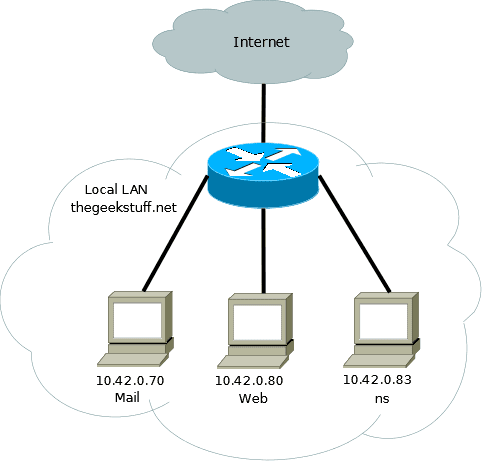
In this tutorial, we are going to setup a local DNS server for the network shown in the below diagram. We’ll use “thegeekstuff.net” domain as an example for this DNS installation. “mail”, “web”, “ns” are the hosts that resides within this domain. It is possible to configure a single system to act as a caching name server, primary/master and secondary/slave. We will configure this DNS as a Primay/Master as well as Caching DNS server.
We’ll be installing DNS server on “10.42.0.83”.
2. Install Bind
Install the bind9 package using the appropriate package management utilities for your Linux distributions. On Debian/Ubuntu flavors, do the following:
$ sudo apt-get install bind9
On Redhat/CentOS/Fedora flavors, do the following:
# yum install bind9
All the DNS configurations are stored under /etc/bind directory. The primary configuration is /etc/bind/named.conf which will include other needed files. The file named /etc/bind/db.root describes the root nameservers in the world.
3. Configure Cache NameServer
The job of a DNS caching server is to query other DNS servers and cache the response. Next time when the same query is given, it will provide the response from the cache. The cache will be updated periodically. Please note that even though you can configure bind to work as a Primary and as a Caching server, it is not advised to do so for security reasons. Having a separate caching server is advisable. All we have to do to configure a Cache NameServer is to add your ISP (Internet Service Provider)’s DNS server or any OpenDNS server to the file /etc/bind/named.conf.options. For Example, we will use google’s public DNS servers, 8.8.8.8 and 8.8.4.4. Uncomment and edit the following line as shown below in /etc/bind/named.conf.options file.
 forwarders {
   8.8.8.8;
   8.8.4.4;
 };
After the above change, restart the DNS server.
$ sudo service bind9 restart
4. Test the Cache NameServer
You can use the dig command to test DNS services. DIG command examples explains more about how to perform DNS lookups.
 $ dig ubuntu.com
 ;; Query time: 1323 msec
DIG Command Examples for DNS Lookup
 $ dig redhat.com
 ; <<>> DiG 9.7.3-RedHat-9.7.3-2.el6 <<>> redhat.com
 ;; global options: +cmd
 ;; Got answer:
 ;; ->>HEADER<<- opcode: QUERY, status: NOERROR, id: 62863
 ;; flags: qr rd ra; QUERY: 1, ANSWER: 1, AUTHORITY: 4, ADDITIONAL: 3
 ;; QUESTION SECTION:
 ;redhat.com.          IN   A
 ;; ANSWER SECTION:
 redhat.com.       37   IN   A    209.132.183.81
 ;; AUTHORITY SECTION:
 redhat.com.       73   IN   NS   ns4.redhat.com.
 redhat.com.       73   IN   NS   ns3.redhat.com.
 redhat.com.       73   IN   NS   ns2.redhat.com.
 redhat.com.       73   IN   NS   ns1.redhat.com.
 ;; ADDITIONAL SECTION:
 ns1.redhat.com.     73   IN   A    209.132.186.218
 ns2.redhat.com.     73   IN   A    209.132.183.2
 ns3.redhat.com.     73   IN   A    209.132.176.100
 ;; Query time: 13 msec
 ;; SERVER: 209.144.50.138#53(209.144.50.138)
 ;; WHEN: Thu Jan 12 10:09:49 2012
 ;; MSG SIZE rcvd: 164
Now when the second time you execute the dig, there should be an improvement in the Query time. As you see below, it took only 3 msec the second time, as it is getting the info from our caching DNS server.
 $ dig ubuntu.com
 ;; Query time: 3 msec
5. Configure Primary/Master Nameserver
Next, we will configure bind9 to be the Primary/Master for the domain/zone “thegeekstuff.net”. As a first step in configuring our Primary/Master Nameserver, we should add Forward and Reverse resolution to bind9. To add a DNS Forward and Reverse resolution to bind9, edit /etc/bind9/named.conf.local.
 zone "thegeekstuff.net" {
   type master;
   file "/etc/bind/db.thegeekstuff.net";
 };
 zone "0.42.10.in-addr.arpa" {
     type master;
     notify no;
     file "/etc/bind/db.10";
 };
Now the file /etc/bind/db.thegeekstuff.net will have the details for resolving hostname to IP address for this domain/zone, and the file /etc/bind/db.10 will have the details for resolving IP address to hostname.
6. Build the Forward Resolution for Primary/Master NameServer
Now we will add the details which is necessary for forward resolution into /etc/bind/db.thegeekstuff.net. First, copy /etc/bind/db.local to /etc/bind/db.thegeekstuff.net
$ sudo cp /etc/bind/db.local /etc/bind/db.thegeekstuff.net
Next, edit the /etc/bind/db.thegeekstuff.net and replace the following.
1. In the line which has SOA: localhost. – This is the FQDN of the server in charge for this domain. I’ve installed bind9 in 10.42.0.83, whose hostname is “ns”. So replace the “localhost.” with “ns.thegeekstuff.net.”. Make sure it end’s with a dot(.).
2. In the line which has SOA: root.localhost. – This is the E-Mail address of the person who is responsible for this server. Use dot(.) instead of @. I’ve replaced with lak.localhost.
3. In the line which has NS: localhost. – This is defining the Name server for the domain (NS). We have to change this to the fully qualified domain name of the name server. Change it to “ns.thegeekstuff.net.”. Make sure you have a “.” at the end.
Next, define the A record and MX record for the domain. A record is the one which maps hostname to IP address, and MX record will tell the mailserver to use for this domain. Once the changes are done, the /etc/bind/db.thegeekstuff.net file will look like the following:
 $TTL  604800
 @  IN SOA ns.thegeekstuff.net. lak.localhost. (
        1024    ; Serial
        604800   ; Refresh
        86400   ; Retry
       2419200   ; Expire
        604800 )  ; Negative Cache TTL
 ;
 @  IN NS ns.thegeekstuff.net.
 thegeekstuff.net.  IN   MX   10   mail.thegeekstuff.net.
 ns IN A  10.42.0.83
 web IN A  10.42.0.80
 mail IN A  10.42.0.70
6. a) Build the Reverse Resolution for Primary/Master NameServer
We will add the details which are necessary for reverse resolution to the file /etc/bind/db.10. Copy the file /etc/bind/db.127 to /etc/bind/db.10
$ sudo cp /etc/bind/db.127 /etc/bind/db.10
Next, edit the /etc/bind/db.10 file, and basically changing the same options as /etc/bind/db.thegeekstuff.net
 $TTL  604800
 @  IN SOA ns.thegeekstuff.net. root.localhost. (
        20     ; Serial
        604800   ; Refresh
        86400   ; Retry
       2419200   ; Expire
        604800 )  ; Negative Cache TTL
 ;
 @  IN NS ns.
Next, for each A record in /etc/bind/db.thegeekstuff.net, add a PTR record.
 $TTL  604800
 @  IN SOA ns.thegeekstuff.net. root.thegeekstuff.net. (
        20   ; Serial
        604800   ; Refresh
        86400   ; Retry
       2419200   ; Expire
        604800 )  ; Negative Cache TTL
 ;
 @  IN NS ns.
 83  IN PTR ns.thegeekstuff.net.
 70  IN PTR mail.thegeekstuff.net.
 80  IN PTR web.thegeekstuff.net.
Whenever you are modifying the file db.thegeekstuff.net and db.10, you need to increment the “Serial” number as well. Typically admin uses DDMMYYSS for serial numbers and when they modify, the change the serial number appropriately. Finally, restart the bind9 service:
$ sudo service bind9 restart
7. Test the DNS server
Now we have configured the DNS server for our domain. We will test our DNS server by pinging mail.thegeekstuff.net from web.thegeekstuff.net. If the ping is success, then we have configured the DNS successfully. You can also use nslookup and dig to test DNS servers. On web.thegeekstuff.net server, add the following to /etc/resolv.conf
nameserver 10.42.0.83
Now ping, mail.thegeekstuff.net, which should resolve the address appropriately from the DNS server that we just configured.
 $ ping mail.thegeekstuff.net
 PING mail.thegeekstuff.net (10.42.0.70) 56(84) bytes of data.
 64 bytes from mail.thegeekstuff.net (10.42.0.70): icmp_req=1 ttl=64 time=0.482 ms
 64 bytes from mail.thegeekstuff.net (10.42.0.70): icmp_req=2 ttl=64 time=0.532 ms
Коментари
Публикуване на коментар